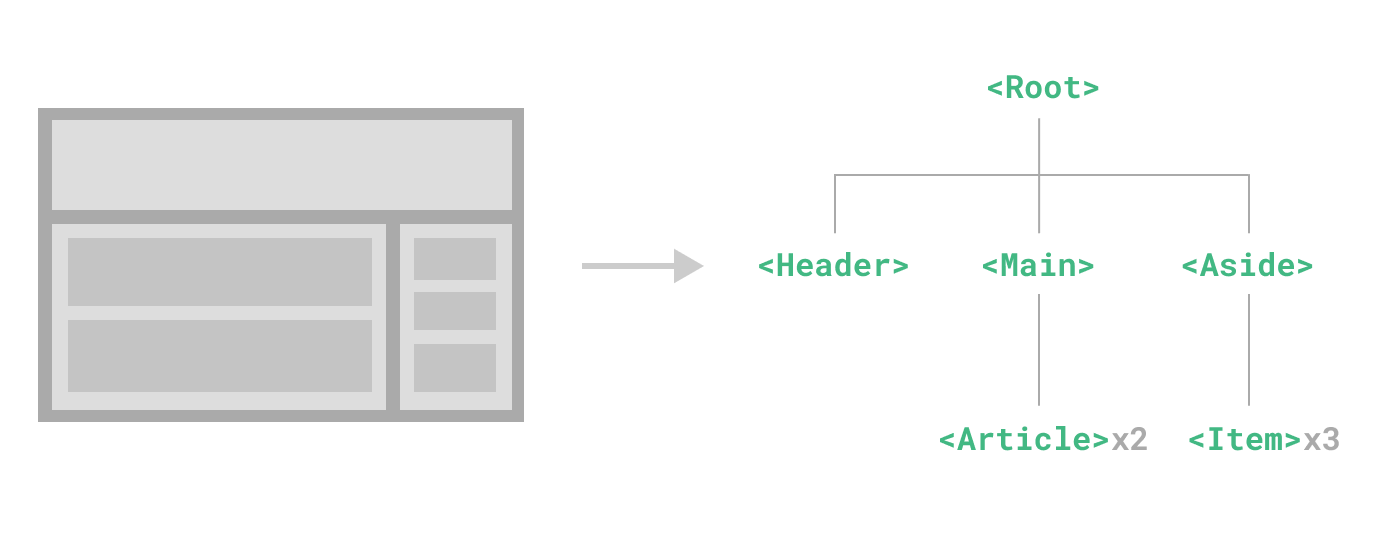
Vue3 组件
#vue3 #前端框架/vue #R1
目录
总结
- Suspense 是 Vue 的一个内置组件,用于协调组件树中的异步依赖关系
1. 基础

1.1. 定义
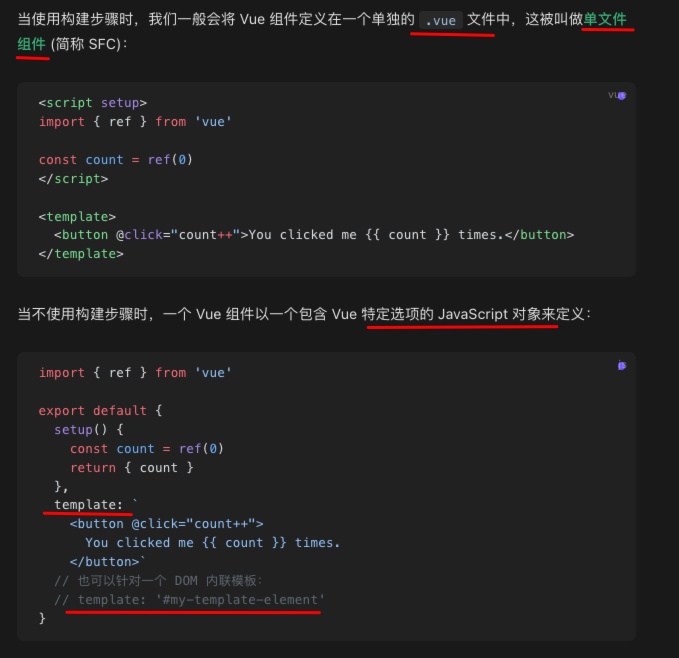
定义:使用 SFC 或者 特定JavaScript 对象

内联模板字符串时,必须这样:
<script type="text/x-template">
1.2. 使用组件
使用组件:<script setup> 中,导入的组件都在模板中直接可用,或全局注册组件都不需要导入
1.3. 传递 props
<script setup> 中 使用 const props = defineProps(['title']) 定义
export default {
  props: ['title'],
  setup(props) {
    console.log(props.title)
  }
}
1.4. 定义事件
<script setup> 中 使用 const emit = defineEmits(['enlarge-text']) 定义
export default {
  emits: ['enlarge-text'],
  setup(props, ctx) {
    ctx.emit('enlarge-text')
  }
}
1.5. 插槽
像 HTML 元素一样向组件中传递内容

1.6. 动态组件
即使用 <component>
<!-- currentTab 改变时组件也改变 -->
<component :is="tabs[currentTab]"></component>
被切换掉的组件会被
卸载,可使用KeepAlive强制存活
1.7. :is 的用法
元素位置限制如何解决? 比如 li 必须在 ul 里,tr 必须在 table里
举例:
<table>
  <blog-post-row></blog-post-row>
</table>
解决方案:
<table>
  <tr is="vue:blog-post-row"></tr>
</table>
又比如,保证 tr/td 一定包裹在 tbody 里面
<template>
  <table>
    <component :is="'tbody'">
      <tr>
        <td>表格内容</td>
      </tr>
    </component>
  </table>
</template>
更多用法详见 4. Vue3 中 is 属性的使用方法和应用场景
2. 注册组件
2.1. 全局注册
即应用内任何地方都可以直接使用 <ComponentA/>
import { createApp } from 'vue'

const app = createApp({})

app.component(
  // 注册的名字
  'MyComponent',
  // 组件的实现
  {
    /* ... */
  }
)

// 链式调用
app
.component('ComponentA', ComponentA)
.component('ComponentB', ComponentB)
.component('ComponentC', ComponentC)
2.1.1. 全局注册的问题
- 不能被
tree-shaking,会导致 js 包过大 - 和使用过多的
全局变量一样,太多全局注册的组件可能会影响应用长期的可维护性
2.2. 局部注册
(1)使用 <script setup>,导入的组件可以直接在模板中使用,无需注册
(2)不使用<script setup>, 则需要使用 components 选项 来显式注册
(3)局部注册的组件在后代组件中不可用,即只在当前组件可用
2.3. 组件命名和使用命名
组件定义命名和组件使用命名:比如 MyComponent 为名注册的组件,在模板中可以通过 <MyComponent> 或 <my-component> ,建议使用 PascalCase 命名,因为:
- ①
PascalCase这样的组件定义在 IDE 中友好 - ②
PascalCase格式的一看就是Vue 组件,- 很容易和
自定义元素 (web components)区分开来
- 很容易和
3. Props 定义
1、props 可以使用 defineProps() 宏来声明
(1) <script setup> : const props = defineProps(['foo'])
(2)不使用setup ,使用 props 选项声明
2、使用一个对象绑定多个 prop,如下示例:
const post = {
  id: 1,
  title: 'My Journey with Vue'
}

`<BlogPost v-bind="post" />`

//******************=======>  等价于
`<BlogPost :id="post.id" :title="post.title" />`
3、props 可以是静态值或动态绑定的值
(1)静态 即 :key=1
(2)动态即:key={post.title}
4、所有的 props 都遵循着单向绑定原则,避免子组件修改父组件的状态。 否则数据流将很容易变得混乱而难以理解,更改一个 prop 的需求通常来源于以下几种场景
(1)prop 被用于传入初始值
const props = defineProps(['initialCounter'])

// 计数器只是将 props.initialCounter 作为初始值
// 像下面这样做就使 prop 和后续更新无关了
const counter = ref(props.initialCounter)
(2)需要对传入的 prop 值做进一步的转换,建议使用 computed
(3)更改对象 / 数组类型的 props,仅在父子组件在设计上本来就需要紧密耦合,不然子组件不允许直接修改,否则都推荐子组件抛出一个事件来通知父组件做出改变,即都回到父组件修改
虽然:因为是引用类型,阻止这种更改不现实,但是,还是尽量按照上面的约定实践
5、Prop 校验
defineProps({
  // 基础类型检查
  // (给出 `null` 和 `undefined` 值则会跳过任何类型检查)
  propA: Number,
  // 多种可能的类型
  propB: [String, Number],
  // 必传,且为 String 类型
  propC: {
    type: String,
    required: true
  },
  // 必传但可为空的字符串
  propD: {
    type: [String, null],
    required: true
  },
  // Number 类型的默认值
  propE: {
    type: Number,
    default: 100
  },
  // 对象类型的默认值
  propF: {
    type: Object,
    // 对象或数组的默认值
    // 必须从一个工厂函数返回。
    // 该函数接收组件所接收到的原始 prop 作为参数。
    default(rawProps) {
      return { message: 'hello' }
    }
  },
  // 自定义类型校验函数
  // 在 3.4+ 中完整的 props 作为第二个参数传入
  propG: {
    validator(value, props) {
      // The value must match one of these strings
      return ['success', 'warning', 'danger'].includes(value)
    }
  },
  // 函数类型的默认值
  propH: {
    type: Function,
    // 不像对象或数组的默认,这不是一个
    // 工厂函数。这会是一个用来作为默认值的函数
    default() {
      return 'Default function'
    }
  }
})
defineProps() 宏中的参数不可以访问 <script setup> 中定义的其他变量,因为在编译时整个表达式都会被移到外部的函数中
4. 组件事件
1、<script setup> 中 定义:const emit = defineEmits(['inFocus', 'submit'])
非
<script setup>中,参考官方文档
2、defineEmits()宏还支持对象语法,比如
<script setup lang="ts">
  const emit = defineEmits<{
      (e: 'change', id: number): void
      (e: 'update', value: string): void
  }>()
 </script>
3、如果一个原生事件的名字 (例如 click) 被定义在 emits 选项中,则监听器只会监听组件触发的 click 事件而不会再响应原生的 click 事件。
- 会覆盖了
如果一个原生事件的名字 (例如
click) 被定义在emits选项中,则监听器只会监听组件触发的click事件而不会再响应原生的click事件。
==重点:defineEmit(['click']) 事件会覆盖原生的 click==
不是说 通过 @click 定义的时间会覆盖通过 DOM 方式定义的事件,别搞混了,更多详见 15. Vue3 事件与原生事件的关系和冒泡机制差异分析
4、和原生 DOM 事件不一样,组件触发的事件没有冒泡机制。你只能监听直接子组件触发的事件。平级组件或是跨越多层嵌套的组件间通信,应使用一个外部的事件总线,或是使用一个全局状态管理方案。
上面说的是 Vue 组件触发的事件,而不是具体元素触发的事件(即原生事件)
5、事件校验,如下代码
<script setup>
const emit = defineEmits({
  // 没有校验
  click: null,

  // 校验 submit 事件
  submit: ({ email, password }) => {
    if (email && password) {
      return true
    } else {
      console.warn('Invalid submit event payload!')
      return false
    }
  }
})

function submitForm(email, password) {
  emit('submit', { email, password })
}
</script>
5. 组件 v-model
如果是
v3.4以前的版本,可以不看这部分
1、v-model 可以实现双向绑定
2、vue 3.4 版本之前实现 v-model 双向绑定,比较麻烦,如下
<!-- Child.vue -->
<script setup>
const props = defineProps(['modelValue'])
const emit = defineEmits(['update:modelValue'])
</script>


<template>
  <input
    :value="props.modelValue"
    @input="emit('update:modelValue', $event.target.value)"
  />
</template>
<!-- Parent.vue -->
<Child
  :modelValue="foo"
  @update:modelValue="$event => (foo = $event)"
/>
3、所以,Vue3.4 实现了 defineModel,简化实现v-model 的流程,如下代码:
<script setup>
const title = defineModel('title')
</script>

<template>
  <input type="text" v-model="title" />
</template>
比单独写简化了不少,这里再解释一下
defineModel()宏的作用:这个宏可以用来声明一个双向绑定 prop,通过父组件的 v-model 来使用
4、defineModel 的底层机制:编译器层面,实现了父子通信的语法糖
- 一个名为
modelValue的prop,本地ref的值与其同步; - 一个名为
update:modelValue的事件,当本地ref的值发生变更时触发。
所以效果就是:
- 它的
.value和父组件的v-model的值同步; - 当它被
子组件变更了,会触发父组件绑定的值一起更新
示例如下:
<script setup>
const firstName = defineModel('firstName')
const lastName = defineModel('lastName')
</script>


<template>
  <input type="text" v-model="firstName" />
  <input type="text" v-model="lastName" />
</template>
5、另外一种实现双向绑定的方法: 使用具有 getter 和 setter 的 computed 属性
<!-- CustomInput.vue -->
<script>
  export default {
    props: ['modelValue'],
    emits: ['update:modelValue'],
    computed: {
      value: {
        get() {
          return this.modelValue
        },
        set(value) {
          this.$emit('update:modelValue', value)
        }
      }
    }
  }
</script>

<template>
  <input v-model="value" />
</template>
6、defineModel 的参数说明,如下代码:
const title = defineModel('title', { required: true })
7、多个 v-model 绑定场景,如下代码:
<script setup>
  const firstName = defineModel('firstName')
  const lastName = defineModel('lastName')
</script>

<template>
  <input type="text" v-model="firstName" />
  <input type="text" v-model="lastName" />
</template>
8、处理 v-model 修饰符
- 内置的修饰符,例如
.trim,.number和.lazy。 - 自定义的修饰符呢?
- 比如自定义的修饰符
capitalize,它会自动将v-model绑定输入的字符串值第一个字母转为大写:
- 比如自定义的修饰符
<script setup>
  const [model, modifiers] = defineModel({
    // get() 省略了,因为这里不需要它
    set(value) {
      if (modifiers.capitalize) {
        return value.charAt(0).toUpperCase() + value.slice(1)
      }
      // 如果使用了 .trim 修饰符,则返回裁剪过后的值
      if(modelModifiers.trim){
        return value.trim()
      }
      return value
    }
  })
</script>

<template>
  <input type="text" v-model="model" />
</template>
9、最后总结defineModel 使用
// 声明 "modelValue" prop,由父组件通过 v-model 使用
const model = defineModel()
// 或者:声明带选项的 "modelValue" prop
const model = defineModel({ type: String })

// 在被修改时,触发 "update:modelValue" 事件
model.value = "hello"

// 声明 "count" prop,由父组件通过 v-model:count 使用
const count = defineModel("count")
// 或者:声明带选项的 "count" prop
const count = defineModel("count", { type: Number, default: 0 })

function inc() {
  // 在被修改时,触发 "update:count" 事件
  count.value++
}
10、关于v-model:title="bookTitle" 和 v-model="title" 究竟什么区别?
v-model="title"默认绑定到modelValue prop,并通过 update:modelValue事件更新v-model:title="bookTitle"绑定到title prop,并通过update:title事件更新
所以,其实v-model="title" 是v-model:modelValue="title" 一种简写方式
具体差别如下:
- 默认绑定的 props 字段不同
- 是否支持
多属性绑定,比如v-model:titlev-model:title1多个,但v-model="title"只支持一个 - 支持
多属性绑定 适合复杂组件,比如组件库里的一些组件绑定场景
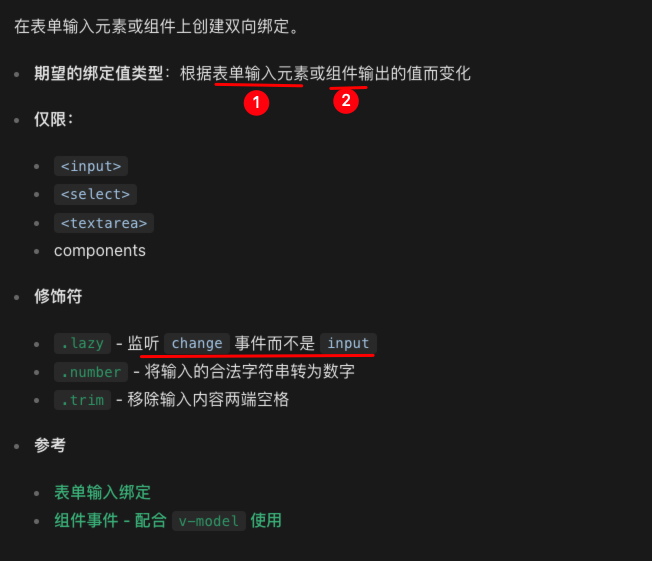
11、在表单输入元素或组件上创建双向绑定,默认表单上直接使用,但组件上还需要使用配合 defineModel

6. Suspense 组件
Suspense 是 Vue 的一个内置组件,用于协调组件树中的异步依赖关系
是实验性的
6.1. 基本用法
<template>
  <Suspense>
    <!-- 默认插槽 - 异步组件 -->
    <template `#default>`
      <AsyncComponent />
    </template>
    <!-- fallback 插槽 - 加载状态 -->
    <template `#fallback>`
      <div>Loading...</div>
    </template>
  </Suspense>
</template>

<script setup>
import { defineAsyncComponent } from 'vue'

const AsyncComponent = defineAsyncComponent(() =>
  import('./components/AsyncComponent.vue')
)
</script>
6.2. 异步组件示例
<!-- AsyncComponent.vue -->
<template>
  <div>
    <h2>{{ data.title }}</h2>
    <p>{{ data.content }}</p>
  </div>
</template>

<script setup>
// 使用 async setup 使组件成为异步组件
const data = await fetch('https://api.example.com/data')
  .then(res => res.json())
</script>
6.3. 处理多个异步组件
<template>
  <Suspense>
    <template `#default>`
      <div>
        <AsyncComponent1 />
        <AsyncComponent2 />
        <AsyncComponent3 />
      </div>
    </template>
    <template `#fallback>`
      <LoadingSpinner />
    </template>
  </Suspense>
</template>

<script setup>
import { defineAsyncComponent } from 'vue'

const AsyncComponent1 = defineAsyncComponent(() =>
  import('./components/AsyncComponent1.vue')
)
const AsyncComponent2 = defineAsyncComponent(() =>
  import('./components/AsyncComponent2.vue')
)
const AsyncComponent3 = defineAsyncComponent(() =>
  import('./components/AsyncComponent3.vue')
)
</script>
6.4. 错误处理 → onErrorCaptured
<template>
  <Suspense @pending="onPending" @resolve="onResolve" @fallback="onFallback">
    <template `#default>`
      <AsyncComponent />
    </template>
    <template `#fallback>`
      <LoadingComponent />
    </template>
  </Suspense>
</template>

<script setup>
import { onErrorCaptured } from 'vue'

// 捕获异步组件中的错误
// 注册一个钩子,在捕获了后代组件传递的错误时调用。
onErrorCaptured((error) => {
  console.error('Async component error:', error)
  // 返回 false 阻止错误继续传播
  return false
})

const onPending = () => {
  console.log('Component is pending')
}

const onResolve = () => {
  console.log('Component is resolved')
}

const onFallback = () => {
  console.log('Fallback is shown')
}
</script>
6.5. 嵌套 Suspense
<template>
  <Suspense>
    <template `#default>`
      <div>
        <h1>Main Content</h1>
        <Suspense>
          <template `#default>`
            <NestedAsyncComponent />
          </template>
          <template `#fallback>`
            <p>Loading nested component...</p>
          </template>
        </Suspense>
      </div>
    </template>
    <template `#fallback>`
      <p>Loading main content...</p>
    </template>
  </Suspense>
</template>
6.6. 结合 Transition 使用
<template>
  <Suspense>
    <template `#default>`
      <AsyncComponent />
    </template>
    <template `#fallback>`
      <Transition name="fade">
        <div class="loading">
          <LoadingSpinner />
        </div>
      </Transition>
    </template>
  </Suspense>
</template>

<style>
.fade-enter-active,
.fade-leave-active {
  transition: opacity 0.5s ease;
}

.fade-enter-from,
.fade-leave-to {
  opacity: 0;
}
</style>
6.7. 在组合式函数中使用
<script setup>
import { ref } from 'vue'

// 异步组合式函数
const useAsyncData = async () => {
  const data = ref(null)
  const response = await fetch('https://api.example.com/data')
  data.value = await response.json()
  return { data }
}

// 在组件中使用
const { data } = await useAsyncData()
</script>

<template>
  <div>
    <h2>{{ data.title }}</h2>
    <p>{{ data.description }}</p>
  </div>
</template>
6.8. 使用 Suspense 的注意事项
- Suspense 只处理其直接子组件的异步依赖,只处理以下异步情况:
- 带有
async setup()的组件 - 使用
defineAsyncComponent定义的组件
- 带有
- 异步组件必须使用
- await 或返回 Promise
- 确保正确处理错误情况
- 考虑使用
transition来优化加载状态的视觉效果 - 在服务器端渲染(SSR)场景中要特别注意使用方式