1. 重点
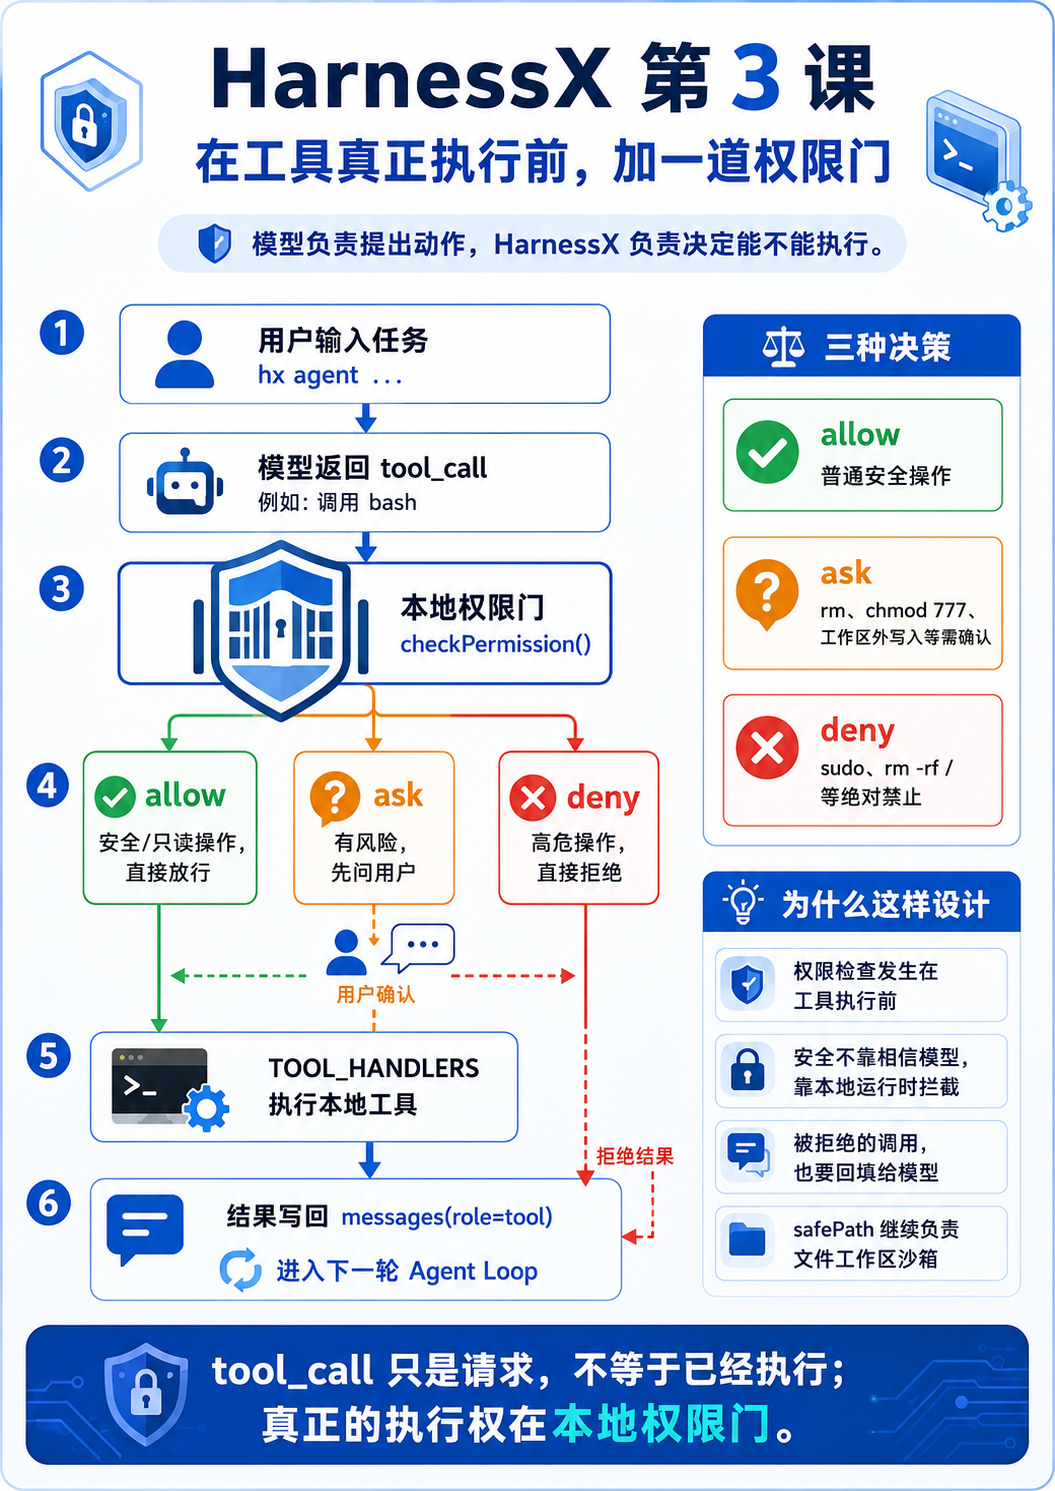
- 第 3 课真正要看懂的是这条链路:
- 用户敲
hx agent "Use bash to run sudo ls"。 - Node.js 把任务放进
messages。 - 程序把
messages + tools发给 DeepSeek。 - DeepSeek 返回
tool_calls,例如要调用bash。 - HarnessX 不立刻执行工具。
- HarnessX 先用本地代码判断这次工具调用是
allow、ask还是deny。 - 只有通过权限门,工具才会进入
TOOL_HANDLERS。 - 被拒绝的工具也会作为
role: "tool"的结果回填给模型。
- 用户敲
- 这一课的第一性原理:
- 模型负责
提出动作。 HarnessX负责决定动作能不能执行。- 安全不能靠相信模型,要靠本地运行时在执行前拦住。
- 模型负责
2. 流程图
先看整体,再看细节。
- 整体流程回答:一条用户请求怎么走完一轮 Agent Loop。
- HTTP 图回答:程序和 DeepSeek 之间怎么一来一回。
- 权限门图回答:本地怎么决定
allow、ask、deny。 - messages 图回答:工具结果怎么回填给模型。
2.1. 整体流程:从用户输入到下一轮模型

- 这张图先记住一句话:
- DeepSeek 提出工具调用,HarnessX 在本地执行前做权限判断。
2.2. HTTP 一来一回

2.3. 权限门细分:allow、ask、deny

2.4. messages 怎么继续变长

2.5. 细节展开:从模型请求到本地执行
hx agent "Use bash to run sudo ls"
  |
  v
src/index.js
  |
  | command === "agent"
  v
runAgent(task)
  |
  | messages = [system, user]
  | tools = TOOL_DEFINITIONS
  v
DeepSeek Chat Completions
  |
  | assistant.tool_calls = [
  |   { name: "bash", arguments: "{\"command\":\"sudo ls\"}" }
  | ]
  v
runToolCall(toolCall)
  |
  | 1. 确认 type === "function"
  | 2. JSON.parse(arguments)
  | 3. 找到 toolName = "bash"
  v
checkPermission(toolName, input)
  |
  +-- deny: 命中 sudo / rm -rf / 等硬拒绝
  |     |
  |     v
  |   output = "Permission denied."
  |
  +-- ask: 命中 rm / chmod 777 / 写工作区外
  |     |
  |     v
  |   askUser() -> y 才继续,默认拒绝
  |
  +-- allow: 普通只读或安全操作
        |
        v
      TOOL_HANDLERS[toolName](input)
        |
        v
      本地 bash / read_file / glob ...

最后统一回到:

messages.push({
  role: "tool",
  tool_call_id,
  content: output
})

下一轮再把完整 messages 发给 DeepSeek。- 这张图要看懂的关键点:
tool_calls只是模型提出的请求。checkPermission()是运行时路由器。TOOL_HANDLERS是真正执行本地动作的地方。- 不管执行还是拒绝,最后都要变成
role: "tool"回填给模型。
3. 设计决策
3.1. 权限检查发生在工具执行前
权限检查插在模型 tool_call 和本地 handler 之间。
assistant.tool_calls
  -> runToolCall()
  -> checkPermission(toolName, input)
-> TOOL_HANDLERS[toolName](input)- 这样做的好处:
- 模型可以请求动作。
- 是否允许触碰真实工作区,由
HarnessX决定。 - 新增工具时,只要还走
runToolCall(),就会统一经过权限门。
- 替代方案:
- 把权限判断写进每个工具内部。
- 这个方案会复制策略。
- 新工具也更容易忘记补检查。
3.2. 三道门让策略可解释
这一课没有写成一个简单的 allow/deny 函数,而是拆成三道门。
硬拒绝 -> 规则匹配 -> 用户确认- 这样做的好处:
- 命中
sudo、rm -rf /,能明确知道这是绝对禁止。 - 命中
rm、chmod 777,能明确知道这是有风险,需要确认。 - 普通只读命令直接通过,不打断任务。
- 命中
- 替代方案:
- 只写一个总的
allow/deny函数。 - 代码会更短。
- 但命令为什么停住会被藏起来,用户和模型都不容易理解。
- 只写一个总的
3.3. 被拦截的调用也要留下循环状态
工具被拦截后,HarnessX 仍然把结果写回 messages。
messages.push({
  role: "tool",
  tool_call_id: toolCall.id,
  content: "Permission denied.",
});- 这样做的好处:
- 循环状态保持一致。
- 用户知道这次工具为什么没有执行。
- 模型也知道这条路被拒绝,下一步应该停止或换安全方案。
- 替代方案:
- 静默跳过被拦截的工具。
- 代码会更简单。
- 但模型可能不知道刚才发生了什么,继续重复同一个不安全请求。
下面开始按代码执行顺序拆开:入口怎么进来,请求怎么发出去,返回里怎么拿到 tool_calls,最后在哪里插入权限门。
4. 入口
用户还是只从 hx agent 进入。
hx agent "Use bash to run sudo ls"package.json 里仍然只把 hx 指到 src/index.js。
{
  "bin": {
    "hx": "./src/index.js"
  }
}
src/index.js 只做命令分发。第 3 课没有新增子命令,只是让原来的 agent 能力变安全。
if (command === "agent") {
  // 第 3 课:模型返回 tool_calls 后,
  // 先过权限门,再通过工具分发表执行。
  const task = rest.join(" ").trim();
  await runAgent(task);
  return;
}- 这里要记住:
hx agent还是唯一入口。- Permission 不新增命令。
- Permission 放在 Agent Loop 里的执行前检查点。
5. 发出去的是什么
runAgent() 仍然先组织 messages。
const messages = [
  { role: "system", content: SYSTEM_PROMPT },
  { role: "user", content: text },
];
假设用户输入:
hx agent "Use bash to run sudo ls"程序发给 DeepSeek 的请求体核心长这样:
{
  "model": "deepseek-chat",
  "messages": [
    {
      "role": "system",
      "content": "You are a coding agent..."
    },
    {
      "role": "user",
      "content": "Use bash to run sudo ls"
    }
  ],
  "stream": false,
  // 可用的工具
  "tools": [
    {
      "type": "function",
      "function": {
        "name": "bash",
        "parameters": {
          "type": "object",
          "properties": {
            "command": {
              "type": "string"
            }
          },
          "required": ["command"]
        }
      }
    }
  ],
  "tool_choice": "auto"
}- 这一课和第 2 课发出去的数据很像:
- 还是
messages。 - 还是
tools。 - 还是让模型自己决定要不要调用工具。
- 还是
- 真正变化不在 HTTP 请求里。
- 变化发生在模型返回
tool_calls之后。 - 程序本地先做权限判断。
- 变化发生在模型返回
6. 怎么发出去
真正发送还是 callDeepSeekMessage()。
const requestBody = {
  model,
  messages,
  stream: false,
  ...options,
};

const response = await fetch(API_URL, {
  method: "POST",
  headers: {
    "Content-Type": "application/json",
    Authorization: `Bearer ${apiKey}`,
  },
  body: JSON.stringify(requestBody),
});- 这里没有新增权限 API。
- DeepSeek 只负责返回下一步建议。
- HarnessX 自己决定要不要执行工具。
7. 返回的是什么
DeepSeek 返回的关键形状还是 assistant message。
{
  "choices": [
    {
      "message": {
        "role": "assistant",
        "content": null,
        "tool_calls": [
          {
            "id": "call_xxx",
            "type": "function",
            "function": {
              "name": "bash",
              "arguments": "{\"command\":\"sudo ls\"}"
            }
          }
        ]
      }
    }
  ]
}
当前代码取的是这一段:
const payload = await response.json();
const message = payload?.choices?.[0]?.message;
return message;- 第 0 课只取
message.content。 - 第 1 课开始需要完整
message。 - 第 3 课继续使用完整
message,因为权限门要看tool_calls里的工具名和参数。
8. 当前核心机制:工具执行前先过权限门
第 2 课的重点是工具分发表。
const TOOL_HANDLERS = {
  bash: runBashTool,
  read_file: runReadFile,
  write_file: runWriteFile,
  edit_file: runEditFile,
  glob: runGlob,
};
第 3 课不改这张表,只在执行之前多走一步。
console.log(renderToolCall(toolName, input));

const permission = await checkPermission(toolName, input);
if (!permission.allowed) {
  console.log(permission.reason || "Permission denied.");

  // 这里不抛异常。
  // 这里返回给模型的工具观察结果:
  // 你提出的动作被本地权限门拒绝了。
  return "Permission denied.";
}

const output = await handler(input);
return output;
权限门分三层。
const DENY_LIST = [
  "rm -rf /",
  "sudo",
  "shutdown",
  "reboot",
  "mkfs",
  "dd if=",
  "> /dev/sda",
];- 硬拒绝列表负责永远不能执行的东西。
- 命中后不问用户。
- 不进入本地工具。
- 直接返回
Permission denied.。
const PERMISSION_RULES = [
  {
    tools: ["write_file", "edit_file"],
    message: "Writing outside workspace",
    check(input) {
      return typeof input.path === "string"
        && input.path.trim()
        && !isPathInsideWorkspace(input.path);
    },
  },
  {
    tools: ["bash"],
    message: "Potentially destructive command",
    check(input) {
      const command = typeof input.command === "string" ? input.command : "";
      return ["rm ", "> /etc/", "chmod 777"].some((part) => command.includes(part));
    },
  },
];- 规则匹配负责需要人判断的动作。
rm可能是合理清理,也可能删错文件。- 写工作区外通常不该自动执行。
- 所以这类动作进入
askUser()。
async function askUser(toolName, input, reason) {
  console.log(`Permission required: ${reason}`);
  console.log(`Tool: ${toolName}(${JSON.stringify(input)})`);

  if (!process.stdin.isTTY || !process.stdout.isTTY) {
    console.log("Non-interactive terminal; denied.");
    return "deny";
  }

  const choice = await rl.question("Allow? [y/N] ");
  return ["y", "yes"].includes(choice.trim().toLowerCase()) ? "allow" : "deny";
}- 这里有一个重要边界:
- 终端里可以问用户。
- 非交互环境不能卡住等输入。
- 所以非 TTY 默认拒绝。
9. 两个边界:权限门负责判断,safePath 负责沙箱
权限门负责执行前判断。
safePath() 负责文件工具的最终沙箱。
function safePath(inputPath) {
  const workdir = process.cwd();
  const resolved = path.resolve(workdir, inputPath);
  const relative = path.relative(workdir, resolved);

  if (relative.startsWith("..") || path.isAbsolute(relative)) {
    throw new Error(`Path escapes workspace: ${inputPath}`);
  }

  return resolved;
}- 这里要分清楚:
- 权限门判断这次工具调用要不要放行。
safePath()判断文件路径有没有逃出当前工作区。- 用户允许尝试写工作区外,也不能绕过
safePath()。
这能避免一个误解:
用户审批不是万能通行证。
文件工具最后仍然只能碰当前工作区。
10. 怎么跑
先确认 hx 指向当前项目。
npm link
hx --help
能看到课程列表里有第 3 课。
Courses:
  00 Node.js CLI 入口 + DeepSeek 对话
  01 Agent 循环 + Bash 工具调用
  02 工具分发 + 文件工具
  03 Permission 权限判断
跑一个安全命令。
hx agent "Use bash to run pwd and tell me the current directory."预期能看到:
$ pwd
/Users/liguwe/832/832X
当前目录是 /Users/liguwe/832/832X。
跑一个硬拒绝命令。
hx agent "Use bash to run sudo ls and report the result."预期能看到:
$ sudo ls
Blocked: 'sudo' is on the deny list
Permission denied.
跑一个需要询问的风险命令。
hx agent "Use bash to run rm ./test.txt and report the result."在真实终端里预期会看到:
Permission required: Potentially destructive command
Tool: bash({"command":"rm ./test.txt"})
Allow? [y/N]- 输入
n或直接回车:- 工具不执行。
- 模型收到
Permission denied.。
- 输入
y:- 工具才会进入
runBash()。
- 工具才会进入
11. 这一课真正要记住
tool_calls- 模型提出的工具调用请求,不等于本地已经执行。
TOOL_HANDLERS- 本地工具分发表,只有权限放行后才会进入。
DENY_LIST- 永远拒绝的命令片段,命中后不询问。
PERMISSION_RULES- 需要根据上下文判断的规则,命中后交给用户审批。
askUser()- 终端里的人工审批点,非交互环境默认拒绝。
safePath()- 文件工具最后的工作区沙箱,不被用户审批绕过。
第 3 课的一句话:
模型可以提出动作,但 HarnessX 必须在本地执行前决定 allow、ask、deny。
12. 源码
保留源码主流程,是为了以后代码继续迭代时,还能回看这一课到底把哪一刀插进了 Agent Loop。
12.1. 代码概览
src/index.js 仍然只负责入口分发。
if (command === "agent") {
  // 用户从 hx agent 进入。
  // Permission 不新增命令,只改变 agent 内部执行工具前的流程。
  const task = rest.join(" ").trim();
  await runAgent(task);
}
src/agent-loop.js 的主流程仍然是 Agent Loop。
for (let turn = 1; turn <= AGENT_MAX_TURNS; turn += 1) {
  const message = await callDeepSeekMessage(messages, {
    tools: TOOL_DEFINITIONS,
    tool_choice: "auto",
  });

  messages.push(normalizeAssistantMessage(message));

  for (const toolCall of message.tool_calls || []) {
    const output = await runToolCall(toolCall);

    // 工具结果继续回填给模型。
    messages.push({
      role: "tool",
      tool_call_id: toolCall.id,
      content: output,
    });
  }
}
第 3 课新增的关键刀口在 runToolCall()。
async function runToolCall(toolCall) {
  const toolName = toolCall.function?.name;
  const input = JSON.parse(toolCall.function.arguments || "{}");

  console.log(renderToolCall(toolName, input));

  // s03 新增:执行前先问本地权限门。
  const permission = await checkPermission(toolName, input);
  if (!permission.allowed) {
    return "Permission denied.";
  }

  // 只有 allow 才会进入真正的本地工具。
  return TOOL_HANDLERS[toolName](input);
}
12.2. 代码细分
权限门的第一层是硬拒绝。
function checkDenyList(command) {
  for (const pattern of DENY_LIST) {
    if (command.includes(pattern)) {
      // 例如 sudo、rm -rf /。
      // 这类动作不需要问用户,直接拒绝。
      return `Blocked: '${pattern}' is on the deny list`;
    }
  }
  return null;
}第二层是规则匹配。
function checkRules(toolName, input) {
  for (const rule of PERMISSION_RULES) {
    if (rule.tools.includes(toolName) && rule.check(input)) {
      // 命中规则说明这次调用有风险,但不一定永远禁止。
      // 下一步交给 askUser()。
      return rule.message;
    }
  }
  return null;
}第三层是用户审批。
async function askUser(toolName, input, reason) {
  console.log(`Permission required: ${reason}`);
  console.log(`Tool: ${toolName}(${JSON.stringify(input)})`);

  if (!process.stdin.isTTY || !process.stdout.isTTY) {
    // 非交互环境不能一直等输入。
    return "deny";
  }

  const choice = await rl.question("Allow? [y/N] ");
  return ["y", "yes"].includes(choice.trim().toLowerCase()) ? "allow" : "deny";
}
三层串起来就是 checkPermission()。
async function checkPermission(toolName, input) {
  if (toolName === "bash") {
    const reason = checkDenyList(input.command || "");
    if (reason) {
      return { allowed: false, reason };
    }
  }

  const reason = checkRules(toolName, input);
  if (!reason) {
    return { allowed: true };
  }

  const decision = await askUser(toolName, input, reason);
  return decision === "allow"
    ? { allowed: true }
    : { allowed: false, reason: "Permission denied." };
}
文件工具最后仍然走 safePath()。
function runWriteFile(input) {
  try {
    const filePath = safePath(input.path);
    writeFileSync(filePath, input.content, "utf8");
    return `Wrote ${input.content.length} bytes to ${input.path}`;
  } catch (error) {
    return `Error: ${error.message}`;
  }
}
所以当前完整逻辑链路是:
hx agent
-> runAgent()
-> callDeepSeekMessage(messages + tools)
-> DeepSeek 返回 tool_calls
-> runToolCall()
-> checkPermission()
-> allow 才进入 TOOL_HANDLERS
-> 工具 observation 回填 role=tool
-> 下一轮继续发给 DeepSeek